

In this document
- Step 4: Before Installation Tasks
- Step 5: Creating Stage
- Step 6: Installing Oracle APPS R12.0.4
Notes:
We see in part 1 of this document how to create a virtual machine to be used for apps installation and installing the operating system. Here we will continue with the creation of the Stage area and installation of oracle apps R12.
Some commands in this article are written by hand and may be miss-spelled, So please make sure you type the correct command specially when doing this as root user on Linux or Unix environment.
Please refer to the installation and upgrade note for your operating system. All documents are available from metalink note 394692.1
Step 4: Before Installation Tasks
Complete the following tasks before procedding with the install process.
Kernel Settings
Add the following lines to the /etc/sysctl.conf file. Simply open it using gedit or vi command and copy/past the following lines.
kernel.sem = 256 32000 100 142
kernel.shmall= 2097152
kernel.shmmax = 2147483648
kernel.shmmni = 4096
kernel.msgmax = 8192
kernel.msgmnb = 65535
kernel.msgmni = 2878
fs.file-max = 65536
net.ipv4.ip_local_port_range = 10000 65000
net.core.rmem_default = 262144
net.core.rmem_max = 262144
net.core.wmem_default = 262144
net.core.wmem_max = 262144
Run the command "sysctl -p" command to invoke the new settings.
$ sysctl -p
Domain Name System (DNS) Resolver Parameters
Two Domain Name System (DNS) resolver parameters (timeout
and attempts) are set by default to low values when the operating system
is installed. Add the
following entries to the /etc/resolv.conf to modify these two parameters.
options attempts:5
options timeout:15
Host Names
Modify the /etc/hosts file to contain the following two lines in the same format (both lines required)
127.0.0.1 localhost.localdomain localhost
172.10.1.106 oratest2.mostafa.com oratest2
If the /etc/sysconfig/networking/profiles/default/network file exists, remove it.
Number of Open File Descriptor
Add the following lines to the file /etc/security/limits.conf to modify the number of Open File Descriptor:
  * hard nofile 65535
  * soft nofile 4096
  * hard nproc 16384
  * soft nproc 2047
OS Users and Groups
Create the OS Users and Groups to be used with oracle applications. As root run the following commands:
# groupadd dba
# groupadd oinstall
# useradd -G dba -g oinstall oracle
# useradd -G dba -g oinstall applmgr
# passwd oracle
# passwd applmgr
# id oracle
# id applmgr
Filesystem Permissions
Set the filesystem permissions and ownership for each user.
# chmod -R 777 /oratest
# chmod -R 777 /appltest
# chown -R oracle:oinstall /oratest
# chown -R applmgr:oinstall /appltest
Simply restart the server before continuing to the next steps.
Step 5: Creating the Stage
To create the stage we only need a user with a read permission to the CD/DVD media drive and a write permission to the file system where we will create the stage. Simply we use the root user and for another reson is that we install the apps for two user oracle and applmgr and will have to start installation also with the root user.
Note that you can use one user only for the stage creation and installation, You can use oracle user but give him the needed permission for the media drive, stage area and install location.
22. Mount the Start Here CD to the media Drive. We use a Virtual machine so from the CD/DVD settings we will mount the start here image to the media drive.

23. Start the staging process by running the following command. You can use TAB key to simplify the writing process. Also do not navigate to the location where the script is and run it from there because you want be able to un-mount the CD-ROM drive then. so simply run the command as
# /media/cdrecorder/Disk1/rapidwiz/adautostg.pl

24. Write the stage area location. In out case it is /u01

25. Enter the mount point for the CD-ROM location. In our case it is /media/cdrecorder. Note it is not written in the image so please don't forget to write it.

26. Enter the choice 1 or press Enter for a complete apps environment installation

27. The Staging process of the Start CD starts

28. Insert the media as instructed by the staging wizard. Use a second terminal to un-mount the media recorder

29. If necessary mount the media recorder to your system using the command mount/media/cdrecorder

30. After the staging is complete run the parid install wizard using the following command:
/u01/StageR12/startCD/Disk1/rapidwiz/rapidwiz

31. Follow the screen to start new installation - choose Install Oracle APPS R12


You must provide a support identified and e-mail. For you Test environment enter any values.

Choose to create New Configurations

Accept the default Global System Settings - no change

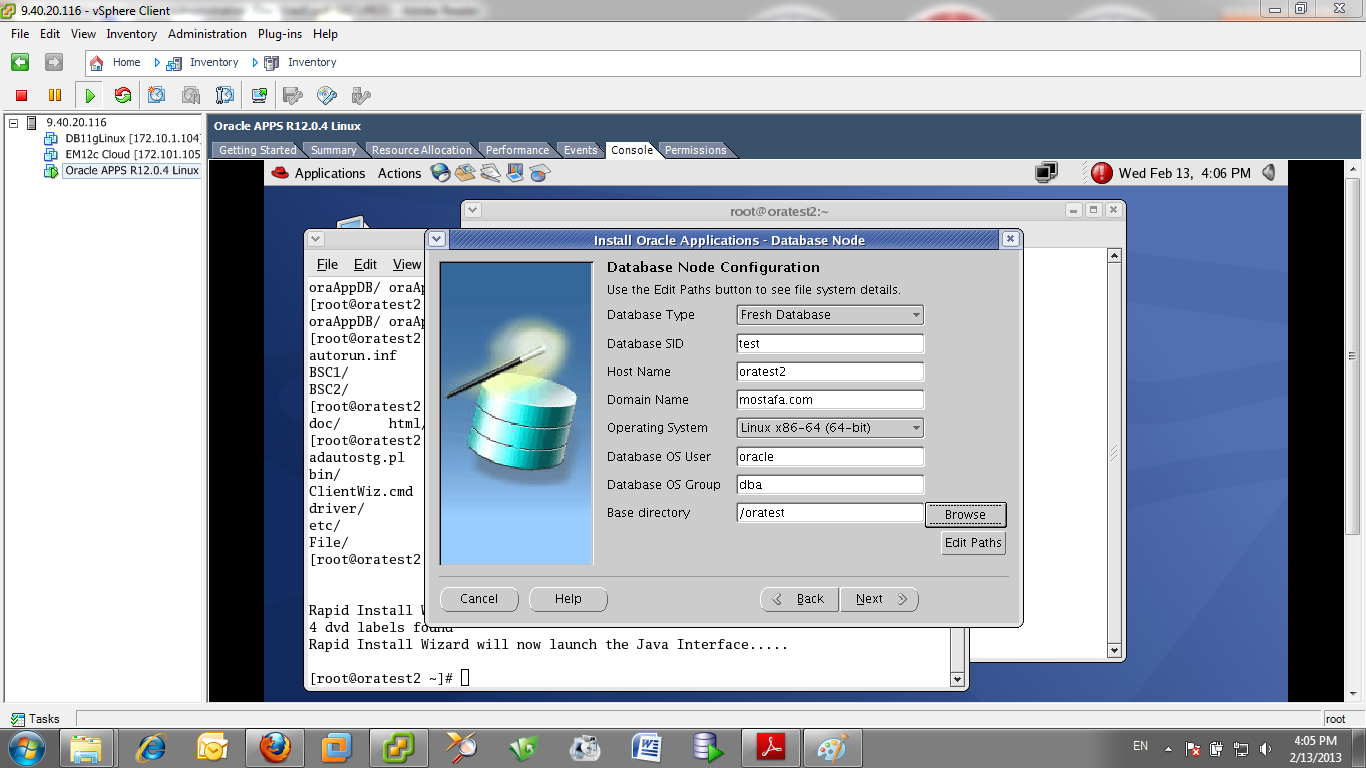
32. Choose the database type "Fresh Database", SID to be "Test". Also choose the OS user for the Database to be oracle User and the base directory to be the file system we created for the database, in our case is "/oratest".
33. Select Suite Licensing and click next to continue

34. Click Next

35. If you want to add more languages choose them here, and click next to continue.

36. Select internationalization settings and click next

37. Here we configure the application node settings. Choose apps OS user to be "applmgr" the user we create to manage apps filesystem and the base directory to be "/appltest" the directory we created for apps. The instance directory can be /appltest/int or the /appltest it self but you have to remember its location for future use.

38. The node installation screen is used with multinode installation. For now we want add any node so click Next to continue.

39. The rapid install wizard then check to see if your system meet the minimum configuration settings and display a warning or error message about its findings. Some warning messages can be ignored and the installation will complete. Error messages cannot be ignored and you have to correct them.
Note: Following the exact instructions in the release notes and rapid install guide eleminates any errors at this step.

40. Click "Next" the "Yes" to start the installation process.


41. The installation wizard gives you updates about the installation progress.

42. Here the installation completes with no warnings. Again if any warnings or errors appeared you have to find the root cause of them, correct and reinstall.

43. You can Click to connect to Oracle Applications to log-in to the Oracle APPS.

44. Here the Log-in screen for the oracle applications. log in using sysadmin/sysadmin

45. And here are the responsibilities assigned to the system administrator.

46. Do not forget to bookmark the login URL to be used by clients to login to applications. In most cases (if you don't change the port numbers) it will be http://hostname.domain.com:8000

Planning/Installing Oracle E-Business Suite (Oracle Applications) R12.0.4 on Linux AS4 Part 1/2
Hope this is informative for you.
Best Regards
Mostafa Mahmoud
February 2013
1 comment:
Very Nice explained ...
Regards
Punit C
Post a Comment